

Bircher Muesli (Birchermüesli) was invented by Maximilian Oskar Bircher-Benner in the 19th century and is traditionally a mix of oats, milk, sweetener and grated apple. These days it’s a hipster’s delight of a breakfast food that’s absolutely perfect for anyone who:
a) wants something filling for breakfast,
b) wants to eat something healthy for breakfast, and
c) only wants to make breakfast once every few days.
I make up 3 days of my bircher every Monday for the perfect balance of organised/lazy food prep. This is because I work 3 days in the office and I want to make and take brekky with me once and once only. If you want to make enough for 5 days because you work a normal-person schedule, divide the amounts by 3 and multiply by 5.
This recipe lends itself to substitution, as long as the ratios are right. And the best thing about it? It tastes better over time – your third day of eating this it’s going to taste so much better than the first day. That gives you a brekky to look forward to more with each day of the week!

Lau’s 3-day bircher
2 medium apples, peeled
1 punnet (125g) fresh blueberries
1 cup of untoasted meusli or, failing that, rolled oats
2-3 Tablespoons ground cinnamon
1 teaspoon vanilla extract or honey
500g plain yogurt (I use the fat free pot set kind)
In a large mixing bowl, grate two apples. Add in the rest of the ingredients and stir well, until completely combined.
Spoon the mixture into an airtight container and refirdgerate, eat over the course of 3 days. Keeps for one week.
What’s your go-to breakfast?
I have many memories of my mother’s cooking from my childhood, and I still make many of the recipes she cooked for me; Grandma’s spaghetti, Risotto Milanese, self-saucing chocolate pudding and one of my all-time favourite comfort foods, ‘Italian Stew’, a recipe someone gave her that came off the back of a tomato puree can involving beef strips, onions, capsicum, tomato puree, egg fettuccini and about half a packet of tasty cheese. Heaven.

However, memories of my father cooking when I was a child are few and far between. I remember him standing over his home-made barbie in front of the veggie patch, searing sausages and steaks while my mum prepped the classics- potato salad with mayo and hard-boiled eggs, ‘normal’ salad of lettuce, tomato, carrot and tasty cheese, and my least favourite, cold curried rice, with those dreaded sultanas.
The only other thing I remember my Dad making was scones. Or should I say, his version of scones, which is pretty much damper. The ingredients are self-raising flour, water, or sometimes milk if he’s feeling particularly decadent, and sultanas, which he mixes into a dough, shapes into a mound, bakes, slices and serves piping hot with margarine and honey.
 My Dad’s not fussy when it comes to food and is most certainly the source of my practical streak, but even I can’t bring myself to simplify the recipe this much. Sure, his method cuts out most of the work and most of the ingredients that make up the scone but I’m sorry to say, it also cuts out most of the flavour. Might be ok for a jolly swagman but it ain’t gonna cut it for me.
 Scones are somewhat fiddly, with the rubbing of butter into flour and the stickiness of dough. That kind of stuff is best avoided in my opinion, so I think my Dad’s on the right track. Grandpa’s scones are a delicious compromise. I only tasted them once, when I was 12 or 13, but I remember them fresh and hot from the oven, firm on the outside, rich and fluffy on the inside. It was a delightful surprise as I never knew Grandpa could cook. We slathered the scones with butter and jam. ‘They’re lemonade scones,’ he said. ‘Really easy.’

A few years ago I came across a lemonade scones recipe on Exclusively Food which is a great resource for basic Aussie recipes. This soon became my go-to scone recipe. It consists of only three ingredients (not counting the optional egg wash): self-raising flour, lemonade and cream. The cream fulfils the role usually played by butter and milk, the lemonade tops up the liquid, acts as a sweetener and the bubbles also help the scones rise.

I always judge recipes in terms of the ratio of effort over results, and the results here are truly worth it. The scones come out of the oven beautifully flakey inside, they rise beautifully and have a lovely golden crust. I would love to experiment with other soft drinks- ginger beer and date scones would be pretty tasty. But I can’t go past this recipe so I’ve never gotten around to it.

Lemonade Scones (from Exclusively Food)
325g (2 cups + 2 tablespoons) of self-raising flour
2/3 cup cold lemonade (I’ve also used lemon squash. It really makes no difference)
2/3 cup full fat cream, cold. I used pure cream as it was on special but you could also use thickened cream.
A beaten egg or milk to glaze, if desired.
Preheat oven to 225°C and line a baking tray with baking paper. The oven must be very hot as scones have a very short cooking time.
In a large bowl, whisk the flour to remove any lumps. Combine lemonade and cream in a medium bowl or jug.
Pour lemonade and cream mixture in to flour and gently stir ingredients together. Be careful not to over mix as the scones need to be light. The dough will be quite sticky and elastic.
Place dough on a lightly floured bench and split in half. Continue halving the dough until you have 16 even portions (I got 15, one was a bit of a runt so I broke it up and added it to the other smaller ones). You may need to heavily flour your hands to do this. Quickly form the portions into balls.
Place the scones in the centre of the tray, so they are just touching. Glaze if desired. Bake for about 12-15 minutes, or until golden and cooked through. Serve immediately, don’t wait!
What’s your favourite family recipe?

It has always amazed me how eager the Sydney food scene is to absorb reinterpret the so-called ‘traditional’ and ‘peasant’ foods of other nations into overpriced, ‘exotic’ wank. Besides the prohibitive prices of foods like tapas, Brazilian bbq and Cuban food, these reincarnations of cuisines which claim to be ‘inspired’ or ‘influenced’ by various countries almost always miss the point of the cuisine they claim to ‘draw inspiration’ from.

In Spain, where dinner is generally served at around 10pm, bars will offer tapas; small, simple, tasty, cheap morsels of food that you eat standing up to stave off hunger and stop you getting too drunk. This fulfils the dual purpose of soaking up alcohol and stimulating thirst. The point of tapas is not to fill you up. It is not even really to have a ‘meal’. People don’t sit down at a table, order a variety of drinks and food and then have them all brought over, eat, drink and pay at the end. In Australia, this style of serving is rare, and tapas becomes just an item on a menu, not a cultural practice.

What baffles me about this mistranslations is that restaurateurs and I presumably have a similar experience when we go to a foreign country. We’ll be walking the streets of whatever town in Spain as the bars will start to fill up with people socialising, drinking and snacking. The overall impression is of vibrancy. Life. Hospitality. Community. I look around me and think ‘wouldn’t it be great if I could bottle this and take it back home?’

Obviously we all view holidays through rose-tinted glasses. But it seems to me that many restaurateurs are viewing theirs with dollar-sign eyeballs. They want to bottle this experience and take it back to Australia, but they also want to pour half of it out, dilute it with water, mark up the price and sell it. They are translating a cuisine completely literally and without any of the nuance that comes from the culture it’s a part of. They take the food of Spain and plonk it down on an Australian restaurant table.

Now, it’s a fair point that Australian diners may not want tapas-style dining, just tapas-style food. Clearly a restaurant cannot force people to order this way or they won’t have any customers. I have noticed though that more and more pubs are serving tapas, and this seems more in line with tapas’ whole ethos.

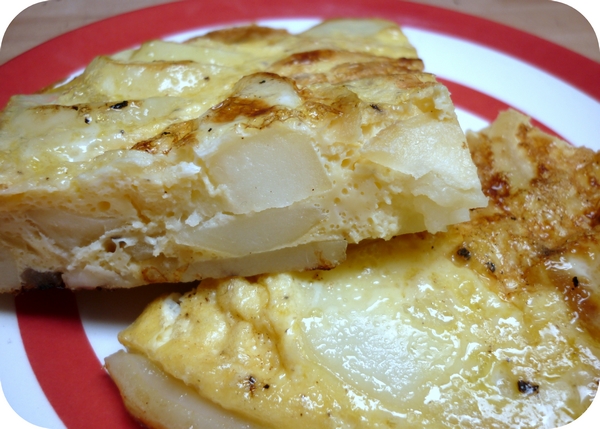
The most basic tapas recipe is tortilla de patatas, sometimes known as tortilla española. In Spain you can buy it in supermarkets and chop it into wedges. It can be eaten hot or cold and consists of eggs, potatos and sometimes onions. I add garlic to mine but that’s completely optional. Serve with tomato sauce or aioli. Or plain.
Tortilla de Patatas
(serves 2)
2 medium potatos, peeled
½ a medium onion
2 cloves of garlic, optional
2-3 Tablespoons Extra Virgin Olive oil
3 eggs
Salt, to taste
Microwave or boil the potatoes, whole until cooked but not mushy. Leave to cool slightly. Whisk the eggs with a pinch of salt.
Finely slice the onion and finely chop the garlic, if using. Once the potatoes are cool enough to touch, cut them into thick slices.
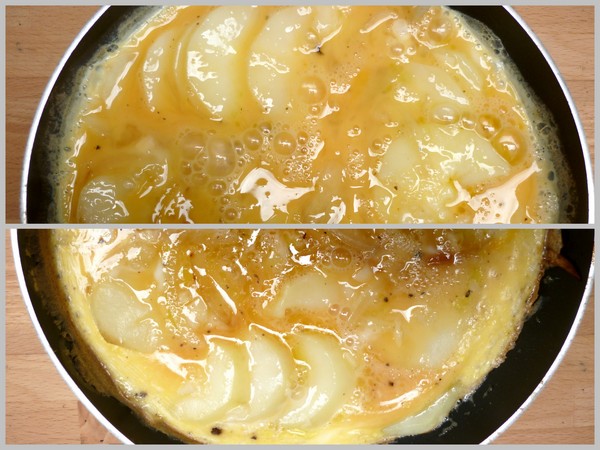
In a very small non-stick pan, heat the oil on a medium high heat. Add the onion and sauté until translucent, then the garlic. Once the onion is golden, take the pan off the heat and turn the heat down low.
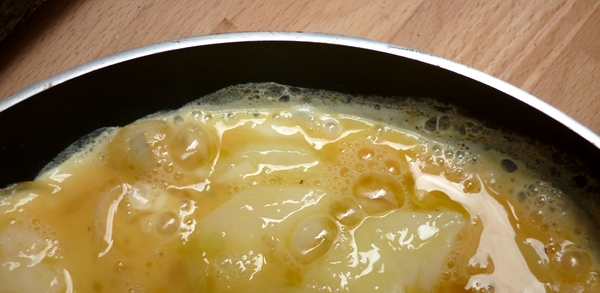
Add the potatoes to the pan. Mix them gently with the onion and garlic to combine but try not to break them. Pour over the egg mixture, making sure it gets into all the gaps, and place the pan on the heat.
The tortilla should cook very slowly and begin to firm up. Some people like it quite runny in the middle, some like it well cooked. I like mine firm so I leave it until almost completely set, 5-10 minutes.
When your tortilla is solid enough to flip, use a large flat spatula to do so. It won’t need much time on the other side as it is just to cook the top.
So, dear reader, what tapas dish do you crave?
One of my favourite things to eat in Spain at the dingy tapas bars we frequented was the kind of aioli that tastes like plastic-y American mayo with some garlic thrown in for good measure. I could drink the stuff, in fact, I’m pretty sure I bought some in a Portuguese supermarket post-Spain and inhaled the whole tub. So any time I had a go at making aioli, I’d just mix mass-produced mayo and garlic. And now that aioli is trendy here, that’s usually what’s served in pubs all around Australia.

I have always shied away from scientific-sounding processes like ‘emulsification’ in cooking so you’ll forgive me if I only got around to making ‘proper’ aioli from scratch about a month ago. I figured it wouldn’t be worth the effort but boy, was I wrong. And what’s more, it goes with pretty much anything savoury – fish, chicken, polenta-crusted potatoes, the list goes on.

To make an aioli you basically do what you would do for a mayonnaise, only using extra virgin olive oil. You blend or mix egg yolks with garlic or herbs until creamy and then, while still mixing, add a large amount of olive oil drop by drop, finishing with a touch of acid like lemon or vinegar. The result is a thick creamy emulsion that will have you licking your fingers with glee, I promise you.

This is a recipe that lends itself to immersion blenders and food processors because the aioli must be constantly in motion or it won’t emulsify. Other than that, it is damn near impossible to stuff it up. You could make it too thick but I’m pretty sure no one would complain if you did and anyway you could just add more lemon, vinegar or water.

Classic Aioli
4 cloves garlic, chopped
2 egg yolks
2/3 cup extra virgin olive oil
½ teaspoon salt
1 Tablespoon of Lemon juice (more if desired)
Turn food processor on to medium. Add garlic and egg yolks and puree until garlic is extremely fine and egg yolks are very creamy.
Add salt and once dissolved, pour the oil, drop by drop or in a very slow stream into the still running food processor. You may want to use a measuring jug to pour from. It should take a full 5 minutes to add the 2/3 cup oil to the egg and garlic blend.
Add the lemon and blend some more. Transfer to a bowl, chill and serve.


Don’t tell my boyfriend, ‘cause he’ll just say ‘I told you so’- I didn’t really like custard until we went to Portugal. When it came to dessert, I was strictly a chocolate-something-served-with-lashings-of-whipped-cream kind of gal. I didn’t really understand the fascination with that sweet, thick, eggy goo. That was until I’d been to Belém and tried the famous tarts that have been made their since 1857. Fresh from the oven, rich, golden and irresistibly crunchy and sprinkled liberally with cinnamon. I still have dreams about them. Sigh.

No, I’m not going to give you a recipe for pasteis de nata (or as they’re known here, Portuguese custard tarts) for the simple reason that there is no way in hell I would ever attempt to make such a thing. For anyone who knows anything about pastry making, making pasties de nata is akin to making custard from scratch on top of making croissants. I ate one every day for breakfast (and many other meals) when I was in Portugal a few years ago, and I can tell you that no Portuguese person would ever make them either – not when you can buy them on practically every street corner for 60 euro cents each.

But what I do like to make, especially to use up any old egg yolks, is homemade custard. Now this may sound fiddly or possibly disastrous but let me assure you as someone with zero patience, it’s not. If the custard gets a bit lumpy, you can always strain it through a sieve, no big deal. And what’s more, it’s made with ingredients most people have on hand. It can be eaten warm or cold, sprinkled with cinnamon and sugar and baked or used as a filling for or accompaniment to various desserts. And what makes it Portuguese? Probably just the sheer number of egg yolks used…

Rich Portuguese Custard (from ‘The Taste of Portugal’ by Edite Vieira)
600ml full cream milk
4-6 egg yolks (I used 4)
1 Tablespoon plain flour
140g caster suger
1 strip lemon peel or a vanilla pod

Mix 3 Tablespoons of milk with the flour and another 3 Tablespoons of the milk with the egg yolks. Set each mixture aside. Score the vanilla pod down the centre if using to allow the seeds to escape while cooking the custard.
Warm the remainder of the milk with the sugar and lemon peel or vanilla pod on a low heat. Mix in the flour paste carefully with a wooden spoon and then slowly bring to the boil, stirring constantly. Cook about 4 minutes.
Remove from the heat and sit for a few minutes. Gradually add the egg yolk mixture in a thin stream, whisking constantly. Still whisking, place back on the heat and cook for one minute.
Remove the vanilla pod or lemon peel and serve.
So, dear readers, do you prefer to eat your custard hot, cold, or not at all?

I have a friend, let’s call her Ms. G, who is in the habit of whipping up amazing and intricate dishes on a regular basis. I’m always excited to be invited round for dinner and luckily, she doesn’t live far and invitations are frequent. Ms. G is adept at homemade ice cream, paella, bread made from scratch, risottos…the list goes on. I’m amazed at her patience at skill and it’s serendipitous that she’s an expert in all those dishes I would never dare attempt.

In my own kitchen, my absolute favourite recipes are those that involve minimal effort but yield maximum results. This probably has as much to do with my lack of patience as it does pragmatism, but nothing gives me more pleasure than recipes that are zero fuss and yet somehow, absolutely stunning. It never continues to amaze me how many recipes pack a massive flavour punch with very few ingredients, very little effort and very little time.

Amaretti was one such happy surprise for me. I had always marvelled at their crisp outer shell and chewy centre, perfect with a ristretto or dunked in a cappuccino. Surely, I thought, they must be fiddly and time consuming to taste this good, something like macarons. And yet these little Italian biscuits were as forgettable as they were delicious; in fact it wasn’t until about a year ago that I looked online for a recipe. I ended up selling some to a cafe for a while but due to their understated appearance, that didn’t last long.

This is one of the easiest and fastest biscuit recipes you will ever make in your life- all you do is whisk a few ingredients together with a fork, roll the mix into balls and bake. Enjoy!
Stellar Amaretti
200g almond meal
¾ cup caster sugar
2 egg whites
¼ teaspoon almond essence
Icing sugar, for dusting
Preheat oven to 175◦c. Line two biscuit trays with baking paper.
Beat sugar, almond essence and egg whites together with a fork until smooth. Stir in almond meal with fork.
With dampish hands, roll small amounts of the mixture into balls of 2-3 cm in diameter and place on trays. I usually fit about 11 per tray. Flatten them with your fingers and dust liberally with icing sugar.
Bake for around 12 minutes. They should not be brown, just starting to get a touch of colour on them. Cool for one hour before serving and/or storing in an airtight container.
Makes 25 amaretti, which will keep for up to 2 months. Makes a great Christmas gift!
So, readers, do you have a favourite no-fuss treat?
About me
 Sharing easy recipes, hunting down the best coffee. Honest accounts, nothing too serious. Read more...
As featured in…


Connect


