

I don’t know about you, but travel for me is mostly about food. When I eat the thing from the place in the actual place of the thing, well, that’s not a very articulate way of putting it, but in the words of Maeve O’Meara, it’s a revelation. And there’s no better way to attempt to relive your travel than to eat the thing that you ate in the place of the thing, but this time, eat it at YOUR place.
I found myself at a bit of a loose end this week, so I decided to make Pão de Queijo (Cheese Puffs), a typical Brazilian snack/breakfast food which I don’t even particularly like, but I wish I was in Brasil right now and what better way to celebrate that than to bake. The main ingredients are manioc/tapioca starch, cheese, eggs, liquid and fat.

When baked, they look a lot like profiteroles but, although the method is similar, it is a hell of a lot more difficult as the starch makes the dough sticky and you have to knead rather than just stir it. I found this virtually impossible so I would recommend using a food processor. Pão de Queijo has a wonderfully squishy texture and these puffs are yummy straight from the oven or reheated in the microwave.
A quick tip: all the recipes I’ve read say not to let the dough sit (it doesn’t need to rise or anything); either bake it immediately or form it into balls and freeze because if you let it sit, it will magically re-liquidise!

Pão de Queijo (a combination of online recipes, this one and this one were particularly helpful)
2 cups full cream milk
½ cup melted butter
450g tapioca/manioc starch (often called tapioca flour, make sure you get one that has the texture of cornflour rather than the one with the texture of polenta),
Excess tapioca/manioc starch for shaping the dough into balls (you can also use oil or water)
3 eggs
2 cups grated cheese (traditionally queijo de minas, but I used a combination of Colby and Romano, mostly Romano)
Preheat the oven to 200°c.
In a medium pan, bring the milk and butter to the boil. Remove from the heat immediately.
Either take your chances and gradually pour the manioc flour into the pan, stirring constantly or put the manioc flour in the food processor and on a slow speed gradually pour in the hot liquid.
Allow to cool; the dough should be cool enough to knead.
Next, knead the dough or turn the food processor on to a medium speed. Add the eggs, one at a time, incorporating each egg completely before the next egg is added. The dough should be smooth and elastic but still very soft and sticky. Add the cheese and knead well until completely incorporated.
You now have 3 choices – flour your hands with tapioca flour, oil them or dampen them. Then roll the dough into even, 2-3cm balls and place on a baking tray lined with baking paper or a silicone mat.
Bake for about 20 minutes, checking after ten minutes to make sure they are not over browning. They are done when they sound hollow when tapped, as they cool they will soften. Freeze or store in an airtight container, best served warm or reheated for 10 seconds in the microwave.
Makes about 30.
What foods from your travels do you love to cook?

It has always amazed me how eager the Sydney food scene is to absorb reinterpret the so-called ‘traditional’ and ‘peasant’ foods of other nations into overpriced, ‘exotic’ wank. Besides the prohibitive prices of foods like tapas, Brazilian bbq and Cuban food, these reincarnations of cuisines which claim to be ‘inspired’ or ‘influenced’ by various countries almost always miss the point of the cuisine they claim to ‘draw inspiration’ from.

In Spain, where dinner is generally served at around 10pm, bars will offer tapas; small, simple, tasty, cheap morsels of food that you eat standing up to stave off hunger and stop you getting too drunk. This fulfils the dual purpose of soaking up alcohol and stimulating thirst. The point of tapas is not to fill you up. It is not even really to have a ‘meal’. People don’t sit down at a table, order a variety of drinks and food and then have them all brought over, eat, drink and pay at the end. In Australia, this style of serving is rare, and tapas becomes just an item on a menu, not a cultural practice.

What baffles me about this mistranslations is that restaurateurs and I presumably have a similar experience when we go to a foreign country. We’ll be walking the streets of whatever town in Spain as the bars will start to fill up with people socialising, drinking and snacking. The overall impression is of vibrancy. Life. Hospitality. Community. I look around me and think ‘wouldn’t it be great if I could bottle this and take it back home?’

Obviously we all view holidays through rose-tinted glasses. But it seems to me that many restaurateurs are viewing theirs with dollar-sign eyeballs. They want to bottle this experience and take it back to Australia, but they also want to pour half of it out, dilute it with water, mark up the price and sell it. They are translating a cuisine completely literally and without any of the nuance that comes from the culture it’s a part of. They take the food of Spain and plonk it down on an Australian restaurant table.

Now, it’s a fair point that Australian diners may not want tapas-style dining, just tapas-style food. Clearly a restaurant cannot force people to order this way or they won’t have any customers. I have noticed though that more and more pubs are serving tapas, and this seems more in line with tapas’ whole ethos.

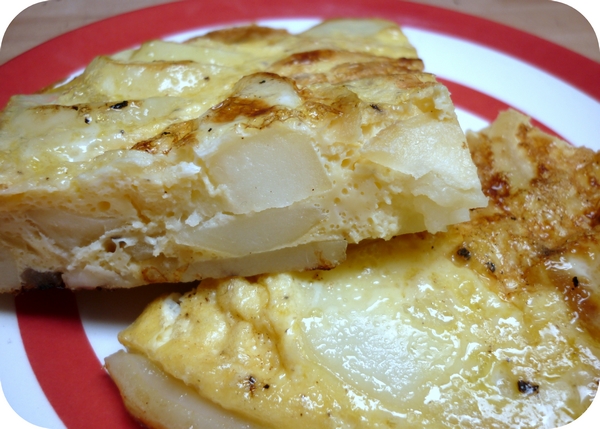
The most basic tapas recipe is tortilla de patatas, sometimes known as tortilla española. In Spain you can buy it in supermarkets and chop it into wedges. It can be eaten hot or cold and consists of eggs, potatos and sometimes onions. I add garlic to mine but that’s completely optional. Serve with tomato sauce or aioli. Or plain.
Tortilla de Patatas
(serves 2)
2 medium potatos, peeled
½ a medium onion
2 cloves of garlic, optional
2-3 Tablespoons Extra Virgin Olive oil
3 eggs
Salt, to taste
Microwave or boil the potatoes, whole until cooked but not mushy. Leave to cool slightly. Whisk the eggs with a pinch of salt.
Finely slice the onion and finely chop the garlic, if using. Once the potatoes are cool enough to touch, cut them into thick slices.
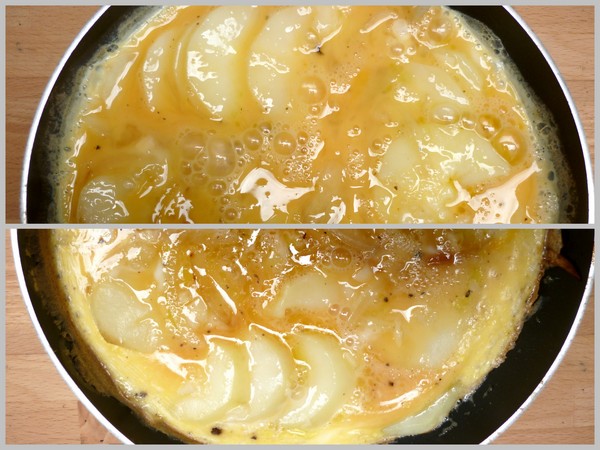
In a very small non-stick pan, heat the oil on a medium high heat. Add the onion and sauté until translucent, then the garlic. Once the onion is golden, take the pan off the heat and turn the heat down low.
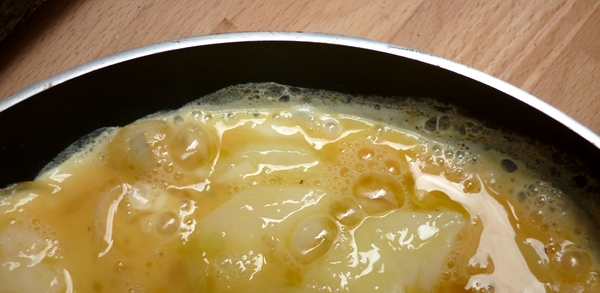
Add the potatoes to the pan. Mix them gently with the onion and garlic to combine but try not to break them. Pour over the egg mixture, making sure it gets into all the gaps, and place the pan on the heat.
The tortilla should cook very slowly and begin to firm up. Some people like it quite runny in the middle, some like it well cooked. I like mine firm so I leave it until almost completely set, 5-10 minutes.
When your tortilla is solid enough to flip, use a large flat spatula to do so. It won’t need much time on the other side as it is just to cook the top.
So, dear reader, what tapas dish do you crave?

Do you have a dish that’s such a staple in your repertoire that you assume you’ve already cooked it for everyone you know? One that’s renowned all over town, prepared for every special occasion? Or used to be, back in the day. ‘You’ve tried mum’s eggplant dip, haven’t you?’ my boyfriend has been asking me for the past 5 years. No. I. HAVEN’T. Ever! Until now.

I was very curious about this magical dip that made my boyfriend sigh at every other eggplant dip I’d ever seen him try. We could be eating the smokiest, most luscious baba ganouj in the world and no matter how amazing I thought it was, he’d say ‘Yeah, but it’s not as good as mum’s eggplant dip.’ Sigh. But then I’m sure we all have our family recipes that make all other versions pale in comparison in our eyes…

The worst part, especially when I was a vego, was never having tried this legendary concoction. So when I started writing Corridor Kitchen I was determined to get my boyfriend’s mum to prepare her Israeli Salat Hatzilim, made of mashed grilled eggplants, homemade mayo and garlic so that I would finally get a taste. And I’ve gotta say that it lived up to the hype.

When it was originally described to me, I don’t think I realised just what an important role the mayo would play in the overall flavour and texture or the dip. It makes it creamy and lush and the eggplant itself, grilled over open flame is smokier and more pungent than I could ever have thought possible. This dip will wow your guests and is totally worth the effort.

Salat Hatzilim
1 eggplant
1 egg yolk
Pinch salt
1/3 – ½ cup canola oil
A splash of water
1-2 Tbsp lemon juice
3-4 cloves garlic, grated
Over a fire that is starting to die down (a combination of flames and embers), cook the eggplant, turning until blackened and blistered on the outside and cooked all the way through. Alternatively, you can cook it over a gas burner like this.
Leave eggplant to cool slightly and then peel off all the skin.
Using a food processor or immersion blender (or a whisk if you want to torture yourself), puree egg yolk until creamy. Add salt and once dissolved, pour the oil, drop by drop, constantly stirring, the way you would to make aioli.
Add the garlic, lemon juice and eggplant and blend together. Serve with pita or crudités, or as part of a meal.

What’s your favourite recipe from your childhood?

My friend Ms. Phonetic, a Texan girl born and bred, often laments the lack of good Mexican, never mind Tex-mex, available here in Sydney. When we were sharing a house back in the day, I remember her half-baked plans for tortilla stands, burrito buses and importing Mexican beer. More recently, I witnessed her untamed joy as we walked through Fiji Market on King Street, Newtown and came a across tins of Chipotles in adobo, Mexican hot chocolate, hominy and a plethora of Mexican sauces.

In recent years Australia has seen a lot of Mexican grill franchises popping up (Guzman y Gomez, Mad Mex and the like). Generally, these places will use large flour tortillas to wrap a burrito filled with your choice of grilled meat, rice, refried or black beans and various salsas, sauces, sour cream and always ALWAYS charge extra for guacamole. Ms. Phonetic maintains that they’re twice the price and nothing like the real thing. Debates about authenticity aside, I’ll have to take her word for it. I guess nothing beats a freshly made tortilla or a fresh batch of Mexican rice or real queso dip.

So, having only my experiences eating at lost-in-translation burrito franchises to go on, I worked to duplicate something of what I had tasted. I scoured the internet for ‘Mexican Rice’ recipes. This recipe is really easy and delicious, all I’ve done is added more spices and extra garlic. My favourite way of serving this is as part of a burrito, which I’ll outline in my next post, but it’s also an amazing side dish. I’ve yet to mix up a batch for Ms. Phonetic but when I do, I’ll let you know how it goes.

Mexican Rice (adapted from The Frugal Chef)
serves 4 as a side dish.
1-2 Tablespoons Olive Oil (I used Extra Virgin because that’s all I buy)
1 Tablespoon pickled jalapeños, finely chopped
2-4 cloves garlic, finely chopped
1/2 a small onion, finely chopped
1 cup Basmati or other long grain rice
1 teaspoon ground cumin
1 teaspoon ground coriander
1 teaspoon ground paprika
1-2 Tablespoons tomato paste
1 cup liquid stock
1/2 cup water
Heat the oil in a small pan to medium high. Sauté the jalapeños, garlic, and onion for a couple of minutes. Add rice and spices and toast a couple more minutes.
When the rice begins to ‘pop’, quickly stir through the tomato paste. Add the stock and water and stir through.
Put the lid on and turn the heat as low as it goes. Simmer 15 to 20 minutes. Burning the bottom of the rice a little is encouraged. I generally turn off the heat after 15 minutes and just let the rice sit for 5 to 10 minutes. Serve with black beans or chicken or in a burrito.
I know it looks ugly, but trust me. It’s delicious.
There are these very rare moments where you stumble across something you never expected, a hidden gem. Even better are those times when someone lets you in on their little secret…

On a recent visit to Canberra, my Mum took me to the Aru Padai Murugan Temple, a Hindu temple in Torrens. To raise money for the construction of the temple they open a canteen every Saturday selling Sri Lankan food, much like the Sri Venkateswara Temple in Helensburgh does.

The food was crazy delicious, not to mention crazy cheap. The dish that really stood out for me was spinach with coconut. This is a tad strange because I’m not normally much of a coconut person, for example, I don’t really like lamingtons all that much. But this vivid green, plain salty dish won my heart and made me realise I actually love coconut in it savoury incarnations. So I did what all of us do in this situation and googled the hell out of Sri Lankan spinach recipes until I found on that fit the bill.

The great thing about this recipe, besides it being quick, easy, vegetarian and high in iron is that (if you have spinach in the freezer) you may have all the ingredients on hand, which makes it great for when you don’t feel like shopping. I served it with basmati rice cooked by the absorption method (directions below) and a big dollop of greek yogurt.

Spinach with Coconut
(makes 2 generous servings)
Canola oil
½ an onion, finely chopped
80g potato or pumpkin, cubed (optional)
½ teaspoon cumin seeds
¼ teaspoon ground cumin
¼ teaspoon ground coriander
¼ teaspoon ground paprika
1 Tablespoon of red lentils
150g spinach, fresh or frozen, finely chopped
A handful of beans or snowpeas, finely chopped (optional)
Salt
Up to 1 cup stock or water
½ cup dessicated coconut
A smidgen of ground cayenne pepper
Parboil the potatos/pumpkin and lentils for 5 minutes, drain and set aside.
Heat oil and cook onion, cumin seeds, lentils and potato or pumpkin (if using) for 5 minutes with a pinch of salt to prevent browning.
Add some liquid and cook for another 5 minutes or until everything is soft.
Add all remaining ingredients and cook until spinach is soft. Serve with yellow rice.

‘Yellow Rice’
½ cup basmati rice
¼ teaspoon mustard seeds (optional)
Canola oil
Salt
Turmeric, for colour
1½ cups water
Heat oil in the pan on high heat and add rice and mustard seeds. Toast until seeds start to ‘pop’.
Add all other ingredients and immediately turn heat down as low as possible. Once rice is simmering just a tiny bit, put lid on and cook for 15 minutes. Leave pan on the stove with the heat turned off for another 5 minutes.
Do you have any food discoveries to share?

Recently, my friends and I had a discussion about carbohydrates. We tried to decide if we were stranded on a desert island and were only allowed one type of carb, which it would be. And I’ve gotta say that although it’s a toss-up between pasta and potatoes for me, potatoes won out. Their just so versatile and impossible to duplicate. In fact, I might go so far as to make them my desert island food. They’re what I’d eat if I were allowed only one kind of food for the rest of my life.

I won and amazing barilla prize pack from Not Quite Nigella recently. It included pastas, sauces a pizza kit and a packet of instant polenta. Awesome. The thing is, I wasn’t quite sure what to do with the instant polenta. I’ve had a bag of the non-instant stuff in my pantry for about 2 years and only recently broke it out to make the polenta with bolognese recipe from ‘Poh’s Kitchen’. I’m ashamed to say that’s the only time I’ve ever really had a go at it as I was under the impression I’d have to stir for an hour, but in reality polenta is a stir-every-so-often-type-deal.

So I was really excited when I stumbled on Malaysian-born Aussie Emily’s blog ‘fuss-free cooking’ and her post on Donna Hay’s Polenta-crusted baked potatoes, which called for instant polenta. Bingo. Two carbs in one dish! I couldn’t wait to make them, but of course I had to tweak the recipe quite a bit, as a pretty much always do. I halved the recipe as I only had half a kilo of potatoes on hand and I used Pontiacs rather than sebagos. I also left the potatoes unpeeled to make them extra crispy (also because I’m a lazy cook). I also used a pizza stone, because my oven is basically a glorified grill. Finally, couldn’t resist adding 3 cloves of garlic in with the polenta. I can’t wait to experiment with maybe a bit of romano cheese and cracked black pepper as well…

So how are they? Unbelievably crisp on the outside and fluffy in the middle, with a gorgeous salty aftertaste and just a hint of garlic. I love their golden colour and how simple they are to prepare – definitely a case of results far outweighing effort.
Polenta-Crusted Potatoes
Serves 2 as a side dish
500g potatos, unpeeled and quartered (I used Pontiacs)
1/3 cup (85g) instant polenta
2 Tablespoons of Extra Virgin Olive Oil
½ teaspoon freshly ground salt
3 cloves of garlic, peeled and finely chopped.
Preheat oven to 220 degrees Celsius (425 degrees Fahrenheit).
Place the potato in a large saucepan of salted cold water and bring to the boil. Cook for 8 minutes or until just tender.
Drain and return to the pan with the polenta, oil, salt and garlic. Shake the pan to fluff the potato and coat in the polenta. Give them a stir.
Place the potatos on a baking tray and roast for 30 minutes or until crisp and golden.

So, dear reader, if you were stranded on a desert island and could only have one carb, what would it be? Pasta? Potatos? Rice? Or something else altogether?
About me
 Sharing easy recipes, hunting down the best coffee. Honest accounts, nothing too serious. Read more...
As featured in…


Connect


