

In case you were wondering, I have decidedly unexotic and Catholic heritage- generic Irish/English stock on my Dad’s side and on my Mum’s side, half Northern Italian and half more of the same. I am, as they say, an anglo mongrel, and the food I grew up on reflects that fact. I am sometimes accused, mostly jokingly but with a dash of truth thrown in, of growing up ‘without culture’ by my partner, his heritage being a mix of Portuguese and Iraqi Jew now considered exotic.
In a way, I think as Australians we shortchange ourselves when we say we have ‘no culture’. We have every culture, that’s the point, and we can serve it all up on a plate and pretend for five minutes that we are all friends. It solves nothing, but it feeds everyone. And there are things that I think all of us who love food understand. Many of the conversations we had growing up centred on food. What did you have for lunch, what should we have for dinner, have you eaten? These are universal questions for perpetually hungry and food-obsessed families, whatever their nationality.
Food for me is mostly all about my mother. It is the same for my partner, on the phone to his mum trying to suss out exactly the right methods or ingredients to get that thing she made for him as a kid just the way she made it. If we cook something our parents used to make, and try to make it the way they would when we were kids, it is kind of ritual, a kind of homage. Whether that thing be a sausage sanger or a perfectly rendered matzo ball, we can chow down on each with equal gusto.
This recipe is basically eggplant parma, a combination of a traditional eggplant fritter recipe from my Grandfather’s family and the tomato sauce that we would eat in some form at least once a week when I was growing up. I would happily subsist on slow-cooked tinned tomatoes for the rest of my life, and this is one mind-numbingly delicious way of serving it.
Eggplant Parmigiana
Serves 8 generously, if served with salads and sides.
2 enormous eggplants, cut into ½ centimetre slices
1 egg, lightly beaten
1 cup flour
1 stale baguette, blended in the food processor
olive oil, for shallow frying
Extra virgin olive oil
2 small onions, finely chopped
pinch chilli flakes
pinch salt
6-8 cloves garlic, finely chopped
4x 400g tins chopped tomatos
1/2 cup red wine
2 sprigs rosemary (optional)
500g mozzarella, sliced
150g good quality parmesan or romano cheese, grated
Tip: You can either make the sauce first or take the ‘do everything at once approach’ outlined below, just keep in mind that the sauce should cook for at least an hour. The whole dish can be made a few days in advance; once everything is layered together, refrigerate and when you want to serve it, bring it up to room temperature before cooking.
Salt the eggplant slices well, layer on a plate and place a heavy object on top. Arrange three bowls on the bench, 1 with the flour, 1 with the beaten egg, and 1 with the breadcrumbs. Leave the weighted eggplant slices to sit for 20 minutes.
Heat the oil in a large pan. Cook the onions until translucent, then add the salt, chilli flakes and garlic. Cook until all ingredients are done but not brown. Add the wine to deglaze the pan, cook a couple of minutes. Add the tomatoes, give the tomato tins a bit of a rinse and pour the resulting water in too. Simmer the sauce for 45 minutes – 11/2 hours, adding in the rosemary about halfway through.
While the sauce is simmering, rinse the eggplants and pat dry. Heat the oil in a large frying pan to shallow fry the eggplant. Then it is just a matter of dipping each eggplant slice in flour, then egg, the breadcrumbs and popping them into the oil. Turn each slice over so it browns on both sides, and when done, put the slices on a plate lined with paper towel to drain well. This process takes about the same amount of time as simmering the sauce.
Remove the rosemary from the sauce, give the mixture a quick blitz with a stick blender if too lumpy, and leave to cool.
Preheat the oven to 180 degrees C. In a large baking dish, layer the sauce, then the eggplant slices, then the mozzarella and then the parmesan romano until the dish is full or the ingredients are exhausted – whichever comes first. Bake for around 45 minutes or until the top is browned.
Do you have a favourite family recipe?

I have to admit that I’m a little bit surprised by my own cooking these days. There are times when it is just so damn…traditional. I find myself saying things like ‘the classics are classics for a reason.’ The cookbooks I’m collecting are published by the Australian Women’s Weekly. I find myself craving things like a sausage. On white bread. With tomato sauce. Could this be my palate’s backlash against the multicultural Australian table? Will I be reduced to eating meat and three boiled veg the rest of my days?!

Somehow I don’t think so. Although I enjoy the pleasures of a simple meal as much as the next minimalist cooking guru, I don’t think my love of fresh baked bread with butter is going to kill off my longing for a good Vietnamese feed, adapted from the real deal or not. Another thing to remember is that while some food may seem exotic to me, they’re just business as usual for those that grew up with them.
All this is really just a roundabout way of saying that when I signed up for today’s pavlova blog hop, I knew I wouldn’t be getting fancy. I knew I’d be sticking with ‘old faithful’, The Australian Women’s weekly 4 egg pav. I’m lazy, so I knew I’d be topping it with whipped cream and frozen raspberries and nothing more, even thought there’s nothing I like better than what I consider the classic pav fruit combo: passionfruit, mango, banana, kiwi fruit and strawberries.

Raspberry Pav (From The Australian Women’s Weekly)
4 eggs whites (tip: separate them in a separate bowl, pouring them into the bowl you will beat them in one by one. Nothing worse than having to chuck out 4 yolked whites rather than two)
1 cup sugar
300ml cream, thickened or pure
3 teaspoons icing sugar mixture
½ teaspoon vanilla extract
Frozen raspberries, to top – I used close to two cups
Preheat your oven to 120°c (110°c fan forced). Line a flat tray with baking paper, draw a 15-20cm circle on it if you like.
Make sure everything (bowl, beaters) is completely dry. Beat the eggs for about 10 minutes on high speed, until firm-ish peaks form. I use an electric hand beater, this may take less time with a standing mixer, I have no idea.
Add the sugar bit by bit, still beating. Wait until the sugar is completely dissolved before adding more. I did this in about 5 lots, it took about 3 minutes.
Shape your pavlova on the tray, levelling it so that it has a flat top. Bake for 1 to 1½ hours, turn off the oven, open the door and allow the pav to cool completely in the oven.
Meanwhile, whip together the cream, icing sugar and vanilla until soft peaks form.
When the pav is completely cooled, carefully peel off the baking paper, place on a plate and decorate. It’s great served immediately or over the next few days.
What about you? What’s your fave ‘traditional’ recipe?

I don’t know about you, but travel for me is mostly about food. When I eat the thing from the place in the actual place of the thing, well, that’s not a very articulate way of putting it, but in the words of Maeve O’Meara, it’s a revelation. And there’s no better way to attempt to relive your travel than to eat the thing that you ate in the place of the thing, but this time, eat it at YOUR place.
I found myself at a bit of a loose end this week, so I decided to make Pão de Queijo (Cheese Puffs), a typical Brazilian snack/breakfast food which I don’t even particularly like, but I wish I was in Brasil right now and what better way to celebrate that than to bake. The main ingredients are manioc/tapioca starch, cheese, eggs, liquid and fat.

When baked, they look a lot like profiteroles but, although the method is similar, it is a hell of a lot more difficult as the starch makes the dough sticky and you have to knead rather than just stir it. I found this virtually impossible so I would recommend using a food processor. Pão de Queijo has a wonderfully squishy texture and these puffs are yummy straight from the oven or reheated in the microwave.
A quick tip: all the recipes I’ve read say not to let the dough sit (it doesn’t need to rise or anything); either bake it immediately or form it into balls and freeze because if you let it sit, it will magically re-liquidise!

Pão de Queijo (a combination of online recipes, this one and this one were particularly helpful)
2 cups full cream milk
½ cup melted butter
450g tapioca/manioc starch (often called tapioca flour, make sure you get one that has the texture of cornflour rather than the one with the texture of polenta),
Excess tapioca/manioc starch for shaping the dough into balls (you can also use oil or water)
3 eggs
2 cups grated cheese (traditionally queijo de minas, but I used a combination of Colby and Romano, mostly Romano)
Preheat the oven to 200°c.
In a medium pan, bring the milk and butter to the boil. Remove from the heat immediately.
Either take your chances and gradually pour the manioc flour into the pan, stirring constantly or put the manioc flour in the food processor and on a slow speed gradually pour in the hot liquid.
Allow to cool; the dough should be cool enough to knead.
Next, knead the dough or turn the food processor on to a medium speed. Add the eggs, one at a time, incorporating each egg completely before the next egg is added. The dough should be smooth and elastic but still very soft and sticky. Add the cheese and knead well until completely incorporated.
You now have 3 choices – flour your hands with tapioca flour, oil them or dampen them. Then roll the dough into even, 2-3cm balls and place on a baking tray lined with baking paper or a silicone mat.
Bake for about 20 minutes, checking after ten minutes to make sure they are not over browning. They are done when they sound hollow when tapped, as they cool they will soften. Freeze or store in an airtight container, best served warm or reheated for 10 seconds in the microwave.
Makes about 30.
What foods from your travels do you love to cook?
It’s funny, but when I’m pressed for time I suddenly am able to achieve a whole lot more. Take this morning, for example. It was my first day at a new job and I suddenly found time to bake a bunch of pumpkin scones. Less time = more baked goods in my household, although it may also have something to do with the fact that I needed a recipe to post today…

No matter, these scones are a breeze. I knocked it up in half an hour and it was well worth the effort. Although not as light and fluffy as the lemonade scones I made a while back, they are the kind of thing you can eat plain, although I think you could up the mixed spice and pumpkin.
Pumpkin Scones from ABC Queensland
50g butter at room temperature
¼ cup brown sugar
1 egg
½ teaspoon mixed spice
1 cup cold mashed pumpkin (otherwise the butter will melt)
2½ cups self-raising flour
Milk or egg, for glazing
Butter and honey, to serve
Preheat oven to very hot, 220°C. Line baking tray with paper.
Cream butter, sugar, eggs and spice. Stir in pumpkin with a wooden spoon.
Add flour in 3 batches, stirring with spoon. The dough will be quite sticky and elastic.
Place dough on a lightly floured bench and split in half. Continue halving the dough until you have 16 even portions (I got 15, one was a bit of a runt so I broke it up and added it to the other smaller ones). You may need to heavily flour your hands to do this. Quickly form the portions into balls.
Place the scones in the centre of the tray, so they are just touching. Bake for about 12-15 minutes, or until golden and cooked through. Slather with butter and honey and serve immediately, don’t wait!

What about you? Do you find you get more done under pressure?

When I was a vego, I cooked heavy on the cheese. Although I didn’t eat a lot of it by itself, it was in or on anything it could be. I remember when I was 13 or so cooking up a pot of thick tomato pasta sauce and thinking to myself ‘What if I added tonnes of cheese to this?’ It was, in the words of Maeve O’Meara, a revelation.

It was a habit I had break when I moved in with my boyfriend, who was aghast at how much cheese I put in everything. Very early on in our relationship I made him Pizzoccheri, a dish from of Grandfather’s family made of buckwheat pasta, potatos, cabbage, garlic, and lashings of melted butter, cubed fontina and grated parmesan. And when I say lashings, I really mean lashings. My biggest mistake was letting him watch me make it. Although he said it was lovely, I could see him shudder as I poured about half a cup of melted butter over the dish. Not exactly heart smart.

These days my main cheesy outlet is romano or parmesan on pasta – I just can’t help myself. I love how cheese can take a plain, usually carb-based dish and turn it into something special. And this is definitely the case with arepas.

Arepas are made all over Colombia and Venezuela and often contain cheese, either mixed through the dough or stuffed in afterwards. They can also be stuffed with a variety of other fillings such as avocado, meat, black beans or fried eggs. They are commonly eaten as snacks or for breakfast but also can form part of a meal. They can be pan fried or deep fried and are both a street food and made at home as they are very easy to make and, in counties with corn as a staple, incredibly cheap. They are also mass produced, in fact, there is even a company in Brisbane that makes them, Grandma ¡Arepas!.

Arepas rellenas de queso (Arepas stuffed with cheese)
2 cups of Harina P.A.N. (pre-cooked white cornmeal)
2 ½ cups lukewarm water
1 teaspoon salt
8 slices of cheese (just smaller than the palm of your hand. I used provalone because it is round and also a bit ‘stringy’)
Pour the water into a large bowl and stir in the salt. Slowly pour in the white cornmeal. I assume this is to avoid lumps, but I’ve done it in reverse order and there was no discernible difference.
Knead the dough until smooth. It will be a bit sticky, so let it sit for a few minutes if you like.
Preheat a frypan to a medium high heat. You could also use a bbq if you want to do them all at once.
Meanwhile, divide the mixture into 8 balls and shape them by hand into flat patties. They should be the same thickness all the way through, about 1-2 centimetres thick and perfectly round. An easier method is to line an egg ring (for frying eggs) with cling wrap and push the balls of dough into shape using that.
When the pan is hot enough, place the arepas in. When they start to ‘pop’ or dance, flip them. They should be browned and have a thick crust, like ‘giraffe skin’. Continue in batches until all are cooked
Allow the arepas to cool slightly, cut open and fill with cheese. You can return them to the heat briefly if you want the cheese to melt.
What’s your favourite cheesy indulgence?
Biscotti is one of those treats that I can’t get enough of but I always forget how time consuming it is. I’ll walk past a packet of biscotti in a supermarket or a deli and think to myself ‘Six dollars a packet? That’s ridiculous!’ I’m frugal by nature but also quite lazy, so every few years I’ll bake up a batch. And that’s when I remember what a pain in the arse baking can be.

The word biscotti comes from the latin for ‘twice baked’ and this is the time consuming part. After mixing up a dough, forming it into two logs and baking them for nearly an hour, the logs are thinly sliced and then each slice needs to be dried out in the oven.
 Biscotti are slender brittle fingers of biscuit with chunks of nuts in them, perfect to dunk in coffee. They are crunchy and addictive with a slight egg taste as the dough is made with eggs, flour and sugar (no milk or butter). Although time consuming, this recipe makes a large batch. If you slice them finely, you will get around one hundred biscotti.

This recipe has been in my recipe folder for ages, so I assume that like most of my baking recipes from my teenage years its from an Australian Women’s Weekly cookbook. Unfortunately I can’t remember the specific cookbook. The original recipe had a cup of hazelnuts, my additions were chocolate and lemon zest, making half the biscotti hazelnut chocolate and the other half hazelnut and lemon. I also roasted the hazelnuts to intensify the flavour and make the skins easier to remove, making them less bitter.

Hazelnut Biscotti two ways (adapted from AWW)
3 eggs
1 cup caster sugar
1 tsp vanilla extract
2½ cups plain flour
½ cup self raising flour
1½ cups hazelnuts (that’s about how much was in the packet I bought)
½ cup chocolate slivers (I chopped some 50% cocoa lindt as its nice and thin and not too dark)
The zest of half a lemon
In a hot oven roast the hazelnuts for about 15 minutes or until fragrant and brown. Leave to cool for half an hour. As the nuts cool they will shrink slightly and their skins will become loose. When cool, rub the skins off with a tea towel.
Turn the oven down to 160°c. Whisk sugar, eggs and vanilla essence together in a large bowl. Stir in flours to a sticky dough.
Divide the dough and put half in another bowl. Add 1 cup of roasted hazelnuts and the lemon zest to one bowl and ½ cup roasted hazelnuts and half a cup of chocolate shards in the other bowl. Mix in the chunks and form the dough into two logs, one of each flavour. Place on a paper-lined baking tray and bake for 45 minutes.
Allow to cool until just warm, slice thinly into 90-100 pieces. Spread the slices on baking trays and bake for 5-10 minutes each until dried out. Cool and serve.

I have many memories of my mother’s cooking from my childhood, and I still make many of the recipes she cooked for me; Grandma’s spaghetti, Risotto Milanese, self-saucing chocolate pudding and one of my all-time favourite comfort foods, ‘Italian Stew’, a recipe someone gave her that came off the back of a tomato puree can involving beef strips, onions, capsicum, tomato puree, egg fettuccini and about half a packet of tasty cheese. Heaven.

However, memories of my father cooking when I was a child are few and far between. I remember him standing over his home-made barbie in front of the veggie patch, searing sausages and steaks while my mum prepped the classics- potato salad with mayo and hard-boiled eggs, ‘normal’ salad of lettuce, tomato, carrot and tasty cheese, and my least favourite, cold curried rice, with those dreaded sultanas.
The only other thing I remember my Dad making was scones. Or should I say, his version of scones, which is pretty much damper. The ingredients are self-raising flour, water, or sometimes milk if he’s feeling particularly decadent, and sultanas, which he mixes into a dough, shapes into a mound, bakes, slices and serves piping hot with margarine and honey.
 My Dad’s not fussy when it comes to food and is most certainly the source of my practical streak, but even I can’t bring myself to simplify the recipe this much. Sure, his method cuts out most of the work and most of the ingredients that make up the scone but I’m sorry to say, it also cuts out most of the flavour. Might be ok for a jolly swagman but it ain’t gonna cut it for me.
 Scones are somewhat fiddly, with the rubbing of butter into flour and the stickiness of dough. That kind of stuff is best avoided in my opinion, so I think my Dad’s on the right track. Grandpa’s scones are a delicious compromise. I only tasted them once, when I was 12 or 13, but I remember them fresh and hot from the oven, firm on the outside, rich and fluffy on the inside. It was a delightful surprise as I never knew Grandpa could cook. We slathered the scones with butter and jam. ‘They’re lemonade scones,’ he said. ‘Really easy.’

A few years ago I came across a lemonade scones recipe on Exclusively Food which is a great resource for basic Aussie recipes. This soon became my go-to scone recipe. It consists of only three ingredients (not counting the optional egg wash): self-raising flour, lemonade and cream. The cream fulfils the role usually played by butter and milk, the lemonade tops up the liquid, acts as a sweetener and the bubbles also help the scones rise.

I always judge recipes in terms of the ratio of effort over results, and the results here are truly worth it. The scones come out of the oven beautifully flakey inside, they rise beautifully and have a lovely golden crust. I would love to experiment with other soft drinks- ginger beer and date scones would be pretty tasty. But I can’t go past this recipe so I’ve never gotten around to it.

Lemonade Scones (from Exclusively Food)
325g (2 cups + 2 tablespoons) of self-raising flour
2/3 cup cold lemonade (I’ve also used lemon squash. It really makes no difference)
2/3 cup full fat cream, cold. I used pure cream as it was on special but you could also use thickened cream.
A beaten egg or milk to glaze, if desired.
Preheat oven to 225°C and line a baking tray with baking paper. The oven must be very hot as scones have a very short cooking time.
In a large bowl, whisk the flour to remove any lumps. Combine lemonade and cream in a medium bowl or jug.
Pour lemonade and cream mixture in to flour and gently stir ingredients together. Be careful not to over mix as the scones need to be light. The dough will be quite sticky and elastic.
Place dough on a lightly floured bench and split in half. Continue halving the dough until you have 16 even portions (I got 15, one was a bit of a runt so I broke it up and added it to the other smaller ones). You may need to heavily flour your hands to do this. Quickly form the portions into balls.
Place the scones in the centre of the tray, so they are just touching. Glaze if desired. Bake for about 12-15 minutes, or until golden and cooked through. Serve immediately, don’t wait!
What’s your favourite family recipe?

Do you have a dish that’s such a staple in your repertoire that you assume you’ve already cooked it for everyone you know? One that’s renowned all over town, prepared for every special occasion? Or used to be, back in the day. ‘You’ve tried mum’s eggplant dip, haven’t you?’ my boyfriend has been asking me for the past 5 years. No. I. HAVEN’T. Ever! Until now.

I was very curious about this magical dip that made my boyfriend sigh at every other eggplant dip I’d ever seen him try. We could be eating the smokiest, most luscious baba ganouj in the world and no matter how amazing I thought it was, he’d say ‘Yeah, but it’s not as good as mum’s eggplant dip.’ Sigh. But then I’m sure we all have our family recipes that make all other versions pale in comparison in our eyes…

The worst part, especially when I was a vego, was never having tried this legendary concoction. So when I started writing Corridor Kitchen I was determined to get my boyfriend’s mum to prepare her Israeli Salat Hatzilim, made of mashed grilled eggplants, homemade mayo and garlic so that I would finally get a taste. And I’ve gotta say that it lived up to the hype.

When it was originally described to me, I don’t think I realised just what an important role the mayo would play in the overall flavour and texture or the dip. It makes it creamy and lush and the eggplant itself, grilled over open flame is smokier and more pungent than I could ever have thought possible. This dip will wow your guests and is totally worth the effort.

Salat Hatzilim
1 eggplant
1 egg yolk
Pinch salt
1/3 – ½ cup canola oil
A splash of water
1-2 Tbsp lemon juice
3-4 cloves garlic, grated
Over a fire that is starting to die down (a combination of flames and embers), cook the eggplant, turning until blackened and blistered on the outside and cooked all the way through. Alternatively, you can cook it over a gas burner like this.
Leave eggplant to cool slightly and then peel off all the skin.
Using a food processor or immersion blender (or a whisk if you want to torture yourself), puree egg yolk until creamy. Add salt and once dissolved, pour the oil, drop by drop, constantly stirring, the way you would to make aioli.
Add the garlic, lemon juice and eggplant and blend together. Serve with pita or crudités, or as part of a meal.

What’s your favourite recipe from your childhood?
There are some foods that are inextricably linked to national identity, considered representative or symbolic of a nation. As Australia post-1788 doesn’t have a long culinary history, we only have a few foods that are really seen as (almost) uniquely Australian; vegemite, the lamington, the pavlova, damper, fairy bread and the Aussie BBQ. But there is one food in particular that expats all over crave, never realising how great their love of it before they leave home- the meat pie.

Of course it’s by no means clear-cut. Food icons are not divided by national boundaries anymore than any other cultural phenomena. For example, almost all the foods that I mentioned above as ‘(almost) uniquely Australian’ are claimed by New Zealand as well. And of course food nostalgia can hit you for any tasty treat or even for foods you don’t like. They don’t even have to be linked to your history or your country. But there is definitely a strong link between national identity and food.

Although making pie from meat is by no means unique to Australia, other than New Zealand there is no other country I’ve come across where virtually everywhere you go, you can grab a pie. This isn’t to say we eat them often; I might have two pies in a whole year, but when you go overseas and you can’t just grab a pie it’s a culture shock. And that to me is the measure of an iconic food. That feeling, a kind of a mix of longing, disbelief and of course hunger when you can’t find that food you’re so used to being able to grab wherever you go. In fact, that may be why I’ll only get around to eating two meat pies in a year: I know they’ll always be there and thus take them for granted.

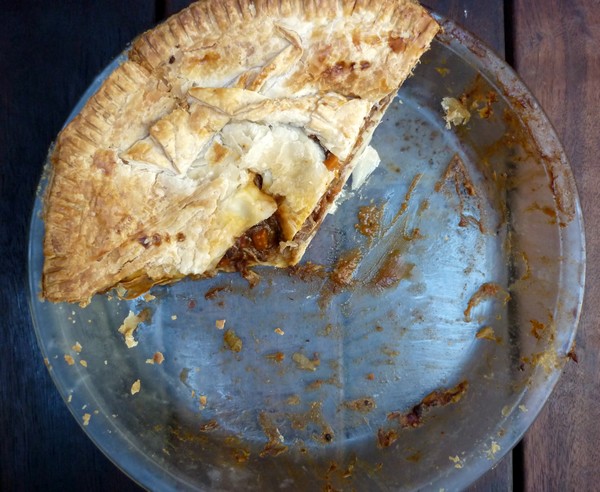
The pies you get at every local bakery, servo and supermarket in Australia are, like any mass-produced food, incredibly different from the kind you’d make at home. In fact, a home-made pie makes no attempt to imitate a mass-produced one, and vice versa. But they are delicious in their own way; flaky, hot and with tender beef chunks, slathered in or (god forbid) without tomato sauce. There is no wrong way to eat it and no wrong time – the Aussie beef pie suits all occasions. You could even serve one up this Australia day…
Aussie Beef Pie
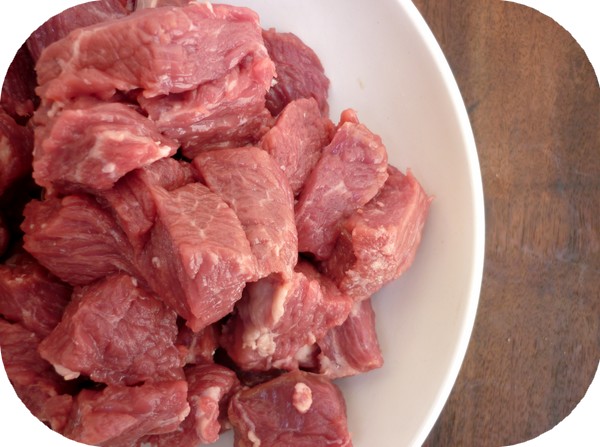
500g chuck steak, diced
2 Tablespoons olive oil
2 cloves garlic, finely chopped
1 large onion, finely chopped
1 carrot, finely chopped
2 sticks celery, finely chopped
1 red capsicum, finely chopped
1 Tablespoon ground paprika
1 Tablespoon tomato paste
1 glass of wine (any kind)
1 glass of water
375ml liquid beef stock
2 bay leaves
Freshly cracked black pepper, to taste
1 cup cold water mixed with 1 Tablespoon cornflour
2 sheets frozen butter puff pastry
1 egg, lightly beaten
Tomato sauce, to serve, if desired.
In a heavy-based saucepan, heat the oil and cook the steak until sealed and browned. Transfer to a bowl.
Add the vegetables and fry until translucent, about 5 minutes. Return the beef to the pan and add the paprika and tomato paste. Stir through.
Add all the remaining ingredients except for the cornflour mixture, pastry and beaten egg. Simmer mix for 45 minutes. Stir through cornflour mixture and simmer until thick. Allow to cool and refrigerate overnight.
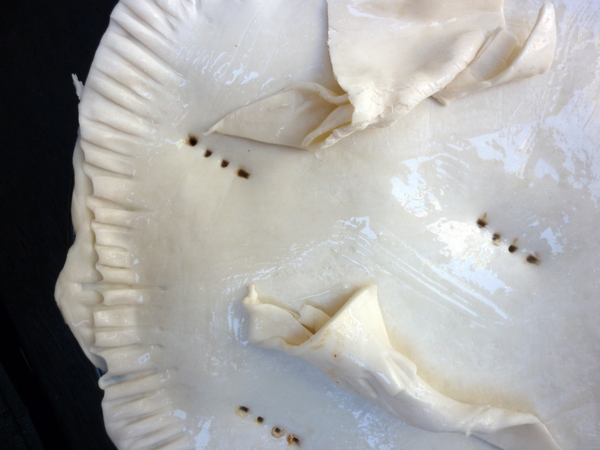
The next day, preheat the oven to 220 ◦c. Lightly grease a round pie dish and line with a sheet of puff pastry. Fill with the beef filling and top with a second pastry sheet. Crimp the two sheets together with a fork and cut away the excess pastry. Finally, prick some holes in the top of the pie to allow air to escape and brush the top with beaten egg.
Bake for 45 minutes or until top and bottom of pie are golden (it helps to use a Pyrex dish so you can see this happening). If the pie browns too quickly on top, cover with foil.
Allow the pie to cool for 10 minutes or so before cutting and serving with tomato sauce and any veg you prefer. For me, it steamed green beans and mashed potato. Enjoy!

What foods represent your national identity?
In Argentina I met an English girl who said that Australia was the first place she ever tried Greek Yogurt. What’s more, she hadn’t had it since. She said she couldn’t wait to get back here to eat Greek yogurt every day! Frankly, I don’t blame her. It’s rich, creamy and tart with the thick lusciousness of sour cream- there’s nothing like it.

The availability of Greek food in Australia is not at all surprising when you consider the number of immigrants and their descendants living in here – Melbourne, for example, is the city with the second largest Greek population in the world. There is a large Greek population in Sydney as well, and a myriad of restaurants and ingredients available very easily if you’re interested in cooking Greek food. This is one of the major benefits of living in this country- diversity of food. You’re hard pressed to find a town where you can’t find a veggie burger or a machiatto or, in my friend’s case, Greek yogurt. This is something that we now take for granted and in many cases, never give a second thought.

It is also one of the major ways people understand multiculturalism. Food is a valuable way for different communities to promote their cultures, as everybody eats and it is considered a starting point for greater familiarity with a culture to experience their food. Of course, it is also only the tip of the iceburg- 20 kinds of cuisine in one place does not a multicultural society make. That’s what we call a food court. I love this recipe for it’s simplicity and the burst of flavour provided by the dill. It is best eaten fresh from the oven, crispy and golden but also makes a brilliant cold lunch if you have any leftovers.

Never fail Spanikopita by Dimitra Alfred, via the SBS Food Safari website
2 bunches English spinach (300g or so)
4 sprigs fresh dill, chopped
4 spring onions, chopped
300g feta cheese
100g ricotta cheese
50g (½ cup) finely grated hard cheese like kefalograviera (I used Pecorino)
5 eggs
2 tbsp dry breadcrumbs (I used matzo meal as I had no bread crumbs on hand)
¼ tsp ground nutmeg
½ tsp freshly ground black pepper
60ml olive oil (4 Tablespoons)
375g packet fresh fillo pastry
Around ¾ cup melted butter
Sesame or nigella seeds, for sprinkling over the top.
Chop the spinach, dill and spring onions very finely. Rinse in a large colander and leave to drain.
Place the feta in a large bowl and mash coarsely (I use a fork). Add the ricotta, hard cheese, eggs, breadcrumbs, nutmeg, pepper and oil. Mix with the fork to combine. Add the spinach.
Preheat oven to 180C. Lightly grease a 20cm x 30cm x 5cm deep baking dish or, as I did, two pyrex 6-cup rectangular dishes. Lay the fillo out on a bench. Cover with a damp tea towel to keep it from drying out.
Line dish with a sheet of filo and butter the filo with a pastry brush. Continue layering until about half the sheets of fillo are used (6 to 8). I cut the filo in half with scissors as I was using two dishes.
Using your hands, gently mix the spinach filling into the cheeses until thoroughly combined. Pour into the prepared pastry base and spread evenly.
Top with remaining filo, buttering each sheet, ensuring the final sheet is well buttered. Trim any overhanging pastry and tuck in.
Use a sharp knife to mark pastry top into diamonds, allowing the knife to pierce the pastry once or twice to allow air to escape during baking. Sprinkle lightly with water, sesame seeds and a few nigella seeds and bake in preheated oven for 45 minutes to 1 hour or until well browned and set.
Gently shake the pan and the spanakopita will slide easily when cooked. Cool on rack for 15 minutes before cutting to serve.

Are there any delicious treats you miss from your overseas adventures?
About me
 Sharing easy recipes, hunting down the best coffee. Honest accounts, nothing too serious. Read more...
As featured in…


Connect


