

Yesterday Lorraine over at Not Quite Nigella described the special treat of being given 20 cents to buy something at the school fete and tossing up between honey joys, pikelets, toffees and other assorted goodies, eventually choosing whichever was the biggest. This reminded me of another nostalgic gastronomic occasion – kids’ parties, where the unfettered appetites of small children are allowed to run wild.
 When I was a child, my parents would let me and my brothers have a party with our friends every second year, and we’d always get to choose a cake out of the Australian Women’s Weekly Kids’ Birthday Cake Cookbook, which, incidentally is one of The Age’s most influential Australian Cookbooks. The cake, be it a train, a Disney character, a doll or a swimming pool filled with green jelly (this was way back in the olden days before blue jelly was invented) would take centre stage amongst the mini frankfurts, party pies, sausage rolls, butterfly cakes and fairy bread on the table. This was one of my favourites, I think I had it for my 5th birthday.

Kids’ parties were never the place to worry about nutrition. Many a picture of me graces the family albums wearing a crooked party hat and an insane sugar-fuelled grin, my mouth smeared with tomato sauce and a trail of hundreds and thousands down the front of my party dress. And I wouldn’t have it any other way.

Fairy bread is another of the few Australian/New Zealand recipes, along with Pavlova and Lamingtons that are entirely unique to their region. It’s something you just take for granted and never give a second thought until someone presents a plate of it to you, and then it takes you back to that place of sugar-fuelled madness not exclusively reserved for children. I have wanted to post a recipe for fairy bread for a while but it’s so easy to make it hardly seemed worth recording. Then I realised that there are probably thousands of recipes that have been forever lost because people thought they were ‘too obvious’ or ‘just common sense.’ To be fair, fairy bread has appeared all over the web, even on U.S. superblog The Kitchn, an arm of Apartment therapy so it’s in no danger of being lost any time soon. But I still want to post it myself, because I love it.
 The key to fairy bread is soft, mass produced bread- no other kind will do. Also, make sure you use hundreds and thousands, the round, crunchy rainbow sprinkles rather than the flat ones. Always be sure to spread the butter all the way to the crust. And finally, rather than sprinkling the hundreds and thousands over the thinly-buttered bread, pour them onto a plate and dip the bread in, allowing the sprinkles to stick.
Fairy bread
1 loaf of fresh, soft, white bread
Softened butter (or margarine if you must)
1 large packet of hundreds and thousands
Pour the hundreds and thousands into a plate or flat bowl. Spread as many slices of bread as you like with a layer of butter.
Dunk the bread into the hundreds and thousands, butter side down. Shake off any excess. Cut the bread into four triangles.
Serve to whoever is closest. It’ll be demolished in 5 minutes flat.
What’s your favourite childhood party food?
I have many memories of my mother’s cooking from my childhood, and I still make many of the recipes she cooked for me; Grandma’s spaghetti, Risotto Milanese, self-saucing chocolate pudding and one of my all-time favourite comfort foods, ‘Italian Stew’, a recipe someone gave her that came off the back of a tomato puree can involving beef strips, onions, capsicum, tomato puree, egg fettuccini and about half a packet of tasty cheese. Heaven.

However, memories of my father cooking when I was a child are few and far between. I remember him standing over his home-made barbie in front of the veggie patch, searing sausages and steaks while my mum prepped the classics- potato salad with mayo and hard-boiled eggs, ‘normal’ salad of lettuce, tomato, carrot and tasty cheese, and my least favourite, cold curried rice, with those dreaded sultanas.
The only other thing I remember my Dad making was scones. Or should I say, his version of scones, which is pretty much damper. The ingredients are self-raising flour, water, or sometimes milk if he’s feeling particularly decadent, and sultanas, which he mixes into a dough, shapes into a mound, bakes, slices and serves piping hot with margarine and honey.
 My Dad’s not fussy when it comes to food and is most certainly the source of my practical streak, but even I can’t bring myself to simplify the recipe this much. Sure, his method cuts out most of the work and most of the ingredients that make up the scone but I’m sorry to say, it also cuts out most of the flavour. Might be ok for a jolly swagman but it ain’t gonna cut it for me.
 Scones are somewhat fiddly, with the rubbing of butter into flour and the stickiness of dough. That kind of stuff is best avoided in my opinion, so I think my Dad’s on the right track. Grandpa’s scones are a delicious compromise. I only tasted them once, when I was 12 or 13, but I remember them fresh and hot from the oven, firm on the outside, rich and fluffy on the inside. It was a delightful surprise as I never knew Grandpa could cook. We slathered the scones with butter and jam. ‘They’re lemonade scones,’ he said. ‘Really easy.’

A few years ago I came across a lemonade scones recipe on Exclusively Food which is a great resource for basic Aussie recipes. This soon became my go-to scone recipe. It consists of only three ingredients (not counting the optional egg wash): self-raising flour, lemonade and cream. The cream fulfils the role usually played by butter and milk, the lemonade tops up the liquid, acts as a sweetener and the bubbles also help the scones rise.

I always judge recipes in terms of the ratio of effort over results, and the results here are truly worth it. The scones come out of the oven beautifully flakey inside, they rise beautifully and have a lovely golden crust. I would love to experiment with other soft drinks- ginger beer and date scones would be pretty tasty. But I can’t go past this recipe so I’ve never gotten around to it.

Lemonade Scones (from Exclusively Food)
325g (2 cups + 2 tablespoons) of self-raising flour
2/3 cup cold lemonade (I’ve also used lemon squash. It really makes no difference)
2/3 cup full fat cream, cold. I used pure cream as it was on special but you could also use thickened cream.
A beaten egg or milk to glaze, if desired.
Preheat oven to 225°C and line a baking tray with baking paper. The oven must be very hot as scones have a very short cooking time.
In a large bowl, whisk the flour to remove any lumps. Combine lemonade and cream in a medium bowl or jug.
Pour lemonade and cream mixture in to flour and gently stir ingredients together. Be careful not to over mix as the scones need to be light. The dough will be quite sticky and elastic.
Place dough on a lightly floured bench and split in half. Continue halving the dough until you have 16 even portions (I got 15, one was a bit of a runt so I broke it up and added it to the other smaller ones). You may need to heavily flour your hands to do this. Quickly form the portions into balls.
Place the scones in the centre of the tray, so they are just touching. Glaze if desired. Bake for about 12-15 minutes, or until golden and cooked through. Serve immediately, don’t wait!
What’s your favourite family recipe?

It has always amazed me how eager the Sydney food scene is to absorb reinterpret the so-called ‘traditional’ and ‘peasant’ foods of other nations into overpriced, ‘exotic’ wank. Besides the prohibitive prices of foods like tapas, Brazilian bbq and Cuban food, these reincarnations of cuisines which claim to be ‘inspired’ or ‘influenced’ by various countries almost always miss the point of the cuisine they claim to ‘draw inspiration’ from.

In Spain, where dinner is generally served at around 10pm, bars will offer tapas; small, simple, tasty, cheap morsels of food that you eat standing up to stave off hunger and stop you getting too drunk. This fulfils the dual purpose of soaking up alcohol and stimulating thirst. The point of tapas is not to fill you up. It is not even really to have a ‘meal’. People don’t sit down at a table, order a variety of drinks and food and then have them all brought over, eat, drink and pay at the end. In Australia, this style of serving is rare, and tapas becomes just an item on a menu, not a cultural practice.

What baffles me about this mistranslations is that restaurateurs and I presumably have a similar experience when we go to a foreign country. We’ll be walking the streets of whatever town in Spain as the bars will start to fill up with people socialising, drinking and snacking. The overall impression is of vibrancy. Life. Hospitality. Community. I look around me and think ‘wouldn’t it be great if I could bottle this and take it back home?’

Obviously we all view holidays through rose-tinted glasses. But it seems to me that many restaurateurs are viewing theirs with dollar-sign eyeballs. They want to bottle this experience and take it back to Australia, but they also want to pour half of it out, dilute it with water, mark up the price and sell it. They are translating a cuisine completely literally and without any of the nuance that comes from the culture it’s a part of. They take the food of Spain and plonk it down on an Australian restaurant table.

Now, it’s a fair point that Australian diners may not want tapas-style dining, just tapas-style food. Clearly a restaurant cannot force people to order this way or they won’t have any customers. I have noticed though that more and more pubs are serving tapas, and this seems more in line with tapas’ whole ethos.

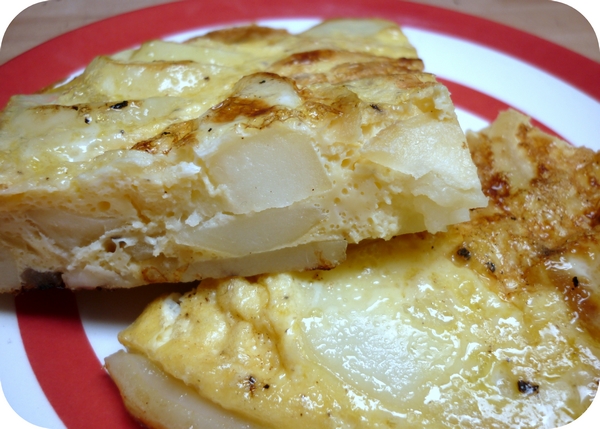
The most basic tapas recipe is tortilla de patatas, sometimes known as tortilla española. In Spain you can buy it in supermarkets and chop it into wedges. It can be eaten hot or cold and consists of eggs, potatos and sometimes onions. I add garlic to mine but that’s completely optional. Serve with tomato sauce or aioli. Or plain.
Tortilla de Patatas
(serves 2)
2 medium potatos, peeled
½ a medium onion
2 cloves of garlic, optional
2-3 Tablespoons Extra Virgin Olive oil
3 eggs
Salt, to taste
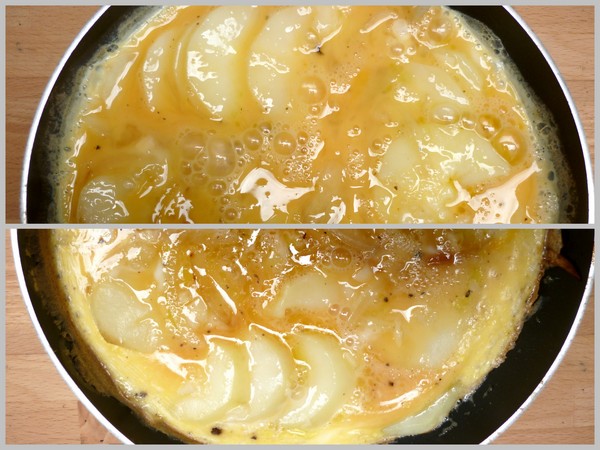
Microwave or boil the potatoes, whole until cooked but not mushy. Leave to cool slightly. Whisk the eggs with a pinch of salt.
Finely slice the onion and finely chop the garlic, if using. Once the potatoes are cool enough to touch, cut them into thick slices.
In a very small non-stick pan, heat the oil on a medium high heat. Add the onion and sauté until translucent, then the garlic. Once the onion is golden, take the pan off the heat and turn the heat down low.
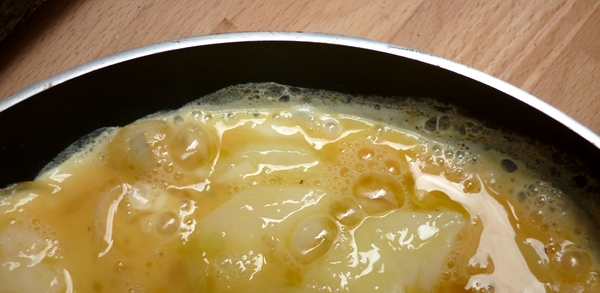
Add the potatoes to the pan. Mix them gently with the onion and garlic to combine but try not to break them. Pour over the egg mixture, making sure it gets into all the gaps, and place the pan on the heat.
The tortilla should cook very slowly and begin to firm up. Some people like it quite runny in the middle, some like it well cooked. I like mine firm so I leave it until almost completely set, 5-10 minutes.
When your tortilla is solid enough to flip, use a large flat spatula to do so. It won’t need much time on the other side as it is just to cook the top.
So, dear reader, what tapas dish do you crave?

It’s no secret to anyone who knows me that I have a very sweet tooth. So imagine my delight at every hostel I stayed at in Argentina and Uruguay when each breakfast came complete with dulce de leche, the classic spreadable caramel that is liberally dolloped on desserts, cakes and even toast. No matter how dodgy the coffee, how tepid the ‘orange fruit drink’ or how stale the bread, there was always dulce de leche to smother it and more than compensate. My favourite way to eat it was as ‘Flan con dulce’, basically a crème caramel slathered in the stuff. Heaven.

It’s quite the trendy condiment these days and I’ve gotta say I’m glad of it. If you’re craving alfajores de maicena, those delicious cornflour-based biscuits sandwiched together with thick dulce de leche and rolled sparingly in caramel, you could make them yourself, and no doubt I will at some point. But if you can’t be bothered, don’t worry as Argentinian cake shops are popping up all over Sydney, from La Paula in Kingsford to Baker Street in Ultimo to Sugarloaf Patisserie in Kogarah.
You’ve probably heard of this cheat’s version of dulce de leche, and I have to admit it’s not quite as good as the real thing, either homemade or mass produced. The traditional way of making it involves boiling and stirring a litre of milk with sugar until you reach the point of thick caramel deliciousness. However, the cheat’s version yields an acceptable result, and when you consider how little effort goes into it.

Cheat’s Dulce de Leche
As many tins of sweetened condensed milk as you want dulce de leche
¼ teaspoon vanilla extract per tin (if desired)
Put the tins of sweetened condensed milk into a large pot. Boil enough water to more than cover the tins. Place the pot on the stove and pour the boiling water over the cans. Bring to the boil.
Once the water is boiling, turn the heat down to a simmer. Simmer for 2-3 hours, making sure the tins are completely covered with water at all times as there is a chance they could explode.
Leave the tins to cool in the pot for an hour or more. Empty each tin into an airtight container and stir through the vanilla if using. Serve on everything!

So, do you have a food that you’re craving from overseas?
One of my favourite things to eat in Spain at the dingy tapas bars we frequented was the kind of aioli that tastes like plastic-y American mayo with some garlic thrown in for good measure. I could drink the stuff, in fact, I’m pretty sure I bought some in a Portuguese supermarket post-Spain and inhaled the whole tub. So any time I had a go at making aioli, I’d just mix mass-produced mayo and garlic. And now that aioli is trendy here, that’s usually what’s served in pubs all around Australia.

I have always shied away from scientific-sounding processes like ‘emulsification’ in cooking so you’ll forgive me if I only got around to making ‘proper’ aioli from scratch about a month ago. I figured it wouldn’t be worth the effort but boy, was I wrong. And what’s more, it goes with pretty much anything savoury – fish, chicken, polenta-crusted potatoes, the list goes on.

To make an aioli you basically do what you would do for a mayonnaise, only using extra virgin olive oil. You blend or mix egg yolks with garlic or herbs until creamy and then, while still mixing, add a large amount of olive oil drop by drop, finishing with a touch of acid like lemon or vinegar. The result is a thick creamy emulsion that will have you licking your fingers with glee, I promise you.

This is a recipe that lends itself to immersion blenders and food processors because the aioli must be constantly in motion or it won’t emulsify. Other than that, it is damn near impossible to stuff it up. You could make it too thick but I’m pretty sure no one would complain if you did and anyway you could just add more lemon, vinegar or water.

Classic Aioli
4 cloves garlic, chopped
2 egg yolks
2/3 cup extra virgin olive oil
½ teaspoon salt
1 Tablespoon of Lemon juice (more if desired)
Turn food processor on to medium. Add garlic and egg yolks and puree until garlic is extremely fine and egg yolks are very creamy.
Add salt and once dissolved, pour the oil, drop by drop or in a very slow stream into the still running food processor. You may want to use a measuring jug to pour from. It should take a full 5 minutes to add the 2/3 cup oil to the egg and garlic blend.
Add the lemon and blend some more. Transfer to a bowl, chill and serve.


My friend Ms. Phonetic, a Texan girl born and bred, often laments the lack of good Mexican, never mind Tex-mex, available here in Sydney. When we were sharing a house back in the day, I remember her half-baked plans for tortilla stands, burrito buses and importing Mexican beer. More recently, I witnessed her untamed joy as we walked through Fiji Market on King Street, Newtown and came a across tins of Chipotles in adobo, Mexican hot chocolate, hominy and a plethora of Mexican sauces.

In recent years Australia has seen a lot of Mexican grill franchises popping up (Guzman y Gomez, Mad Mex and the like). Generally, these places will use large flour tortillas to wrap a burrito filled with your choice of grilled meat, rice, refried or black beans and various salsas, sauces, sour cream and always ALWAYS charge extra for guacamole. Ms. Phonetic maintains that they’re twice the price and nothing like the real thing. Debates about authenticity aside, I’ll have to take her word for it. I guess nothing beats a freshly made tortilla or a fresh batch of Mexican rice or real queso dip.

So, having only my experiences eating at lost-in-translation burrito franchises to go on, I worked to duplicate something of what I had tasted. I scoured the internet for ‘Mexican Rice’ recipes. This recipe is really easy and delicious, all I’ve done is added more spices and extra garlic. My favourite way of serving this is as part of a burrito, which I’ll outline in my next post, but it’s also an amazing side dish. I’ve yet to mix up a batch for Ms. Phonetic but when I do, I’ll let you know how it goes.

Mexican Rice (adapted from The Frugal Chef)
serves 4 as a side dish.
1-2 Tablespoons Olive Oil (I used Extra Virgin because that’s all I buy)
1 Tablespoon pickled jalapeños, finely chopped
2-4 cloves garlic, finely chopped
1/2 a small onion, finely chopped
1 cup Basmati or other long grain rice
1 teaspoon ground cumin
1 teaspoon ground coriander
1 teaspoon ground paprika
1-2 Tablespoons tomato paste
1 cup liquid stock
1/2 cup water
Heat the oil in a small pan to medium high. Sauté the jalapeños, garlic, and onion for a couple of minutes. Add rice and spices and toast a couple more minutes.
When the rice begins to ‘pop’, quickly stir through the tomato paste. Add the stock and water and stir through.
Put the lid on and turn the heat as low as it goes. Simmer 15 to 20 minutes. Burning the bottom of the rice a little is encouraged. I generally turn off the heat after 15 minutes and just let the rice sit for 5 to 10 minutes. Serve with black beans or chicken or in a burrito.
I know it looks ugly, but trust me. It’s delicious.
There are these very rare moments where you stumble across something you never expected, a hidden gem. Even better are those times when someone lets you in on their little secret…

On a recent visit to Canberra, my Mum took me to the Aru Padai Murugan Temple, a Hindu temple in Torrens. To raise money for the construction of the temple they open a canteen every Saturday selling Sri Lankan food, much like the Sri Venkateswara Temple in Helensburgh does.

The food was crazy delicious, not to mention crazy cheap. The dish that really stood out for me was spinach with coconut. This is a tad strange because I’m not normally much of a coconut person, for example, I don’t really like lamingtons all that much. But this vivid green, plain salty dish won my heart and made me realise I actually love coconut in it savoury incarnations. So I did what all of us do in this situation and googled the hell out of Sri Lankan spinach recipes until I found on that fit the bill.

The great thing about this recipe, besides it being quick, easy, vegetarian and high in iron is that (if you have spinach in the freezer) you may have all the ingredients on hand, which makes it great for when you don’t feel like shopping. I served it with basmati rice cooked by the absorption method (directions below) and a big dollop of greek yogurt.

Spinach with Coconut
(makes 2 generous servings)
Canola oil
½ an onion, finely chopped
80g potato or pumpkin, cubed (optional)
½ teaspoon cumin seeds
¼ teaspoon ground cumin
¼ teaspoon ground coriander
¼ teaspoon ground paprika
1 Tablespoon of red lentils
150g spinach, fresh or frozen, finely chopped
A handful of beans or snowpeas, finely chopped (optional)
Salt
Up to 1 cup stock or water
½ cup dessicated coconut
A smidgen of ground cayenne pepper
Parboil the potatos/pumpkin and lentils for 5 minutes, drain and set aside.
Heat oil and cook onion, cumin seeds, lentils and potato or pumpkin (if using) for 5 minutes with a pinch of salt to prevent browning.
Add some liquid and cook for another 5 minutes or until everything is soft.
Add all remaining ingredients and cook until spinach is soft. Serve with yellow rice.

‘Yellow Rice’
½ cup basmati rice
¼ teaspoon mustard seeds (optional)
Canola oil
Salt
Turmeric, for colour
1½ cups water
Heat oil in the pan on high heat and add rice and mustard seeds. Toast until seeds start to ‘pop’.
Add all other ingredients and immediately turn heat down as low as possible. Once rice is simmering just a tiny bit, put lid on and cook for 15 minutes. Leave pan on the stove with the heat turned off for another 5 minutes.
Do you have any food discoveries to share?

Recently, my friends and I had a discussion about carbohydrates. We tried to decide if we were stranded on a desert island and were only allowed one type of carb, which it would be. And I’ve gotta say that although it’s a toss-up between pasta and potatoes for me, potatoes won out. Their just so versatile and impossible to duplicate. In fact, I might go so far as to make them my desert island food. They’re what I’d eat if I were allowed only one kind of food for the rest of my life.

I won and amazing barilla prize pack from Not Quite Nigella recently. It included pastas, sauces a pizza kit and a packet of instant polenta. Awesome. The thing is, I wasn’t quite sure what to do with the instant polenta. I’ve had a bag of the non-instant stuff in my pantry for about 2 years and only recently broke it out to make the polenta with bolognese recipe from ‘Poh’s Kitchen’. I’m ashamed to say that’s the only time I’ve ever really had a go at it as I was under the impression I’d have to stir for an hour, but in reality polenta is a stir-every-so-often-type-deal.

So I was really excited when I stumbled on Malaysian-born Aussie Emily’s blog ‘fuss-free cooking’ and her post on Donna Hay’s Polenta-crusted baked potatoes, which called for instant polenta. Bingo. Two carbs in one dish! I couldn’t wait to make them, but of course I had to tweak the recipe quite a bit, as a pretty much always do. I halved the recipe as I only had half a kilo of potatoes on hand and I used Pontiacs rather than sebagos. I also left the potatoes unpeeled to make them extra crispy (also because I’m a lazy cook). I also used a pizza stone, because my oven is basically a glorified grill. Finally, couldn’t resist adding 3 cloves of garlic in with the polenta. I can’t wait to experiment with maybe a bit of romano cheese and cracked black pepper as well…

So how are they? Unbelievably crisp on the outside and fluffy in the middle, with a gorgeous salty aftertaste and just a hint of garlic. I love their golden colour and how simple they are to prepare – definitely a case of results far outweighing effort.
Polenta-Crusted Potatoes
Serves 2 as a side dish
500g potatos, unpeeled and quartered (I used Pontiacs)
1/3 cup (85g) instant polenta
2 Tablespoons of Extra Virgin Olive Oil
½ teaspoon freshly ground salt
3 cloves of garlic, peeled and finely chopped.
Preheat oven to 220 degrees Celsius (425 degrees Fahrenheit).
Place the potato in a large saucepan of salted cold water and bring to the boil. Cook for 8 minutes or until just tender.
Drain and return to the pan with the polenta, oil, salt and garlic. Shake the pan to fluff the potato and coat in the polenta. Give them a stir.
Place the potatos on a baking tray and roast for 30 minutes or until crisp and golden.

So, dear reader, if you were stranded on a desert island and could only have one carb, what would it be? Pasta? Potatos? Rice? Or something else altogether?

If you’ve paid attention thus far, you’ll know I eschew any food prep that’s complex or time consuming, unless I know it inside out. I’m also a massive declutterer so I’m not into purchasing appliances unless they’re absolutely necessary (all part and parcel of having a tiny kitchen). In fact, the only thing that made me happier than my aunt giving me her old blender a few years back was a few months back when it broke. ‘Huzzah!’ I thought, ‘Now I can get rid of something!’

The problem with this philosophy is that sometimes you miss out on opportunities. From listening to my friend Gina talk, making ice cream is a complex process. It involves making a custard and having an ice cream maker taking up space in your freezer. Just thinking about doing either of these things makes me sleepy. As a result, I’ve never had a go at homemade ice cream, sorbet or gelato other than a few times with my Grandfather when I was a teen. Or a tween. Some marketing-type-word.

So when I went round to Gina’s to watch her make ice cream I was surprised that it could be so easy. I figured since she was doing all the work, I should supply the ingredients, so we chose a blackberry banana sorbet as I had a kilo of what I thought were blackberries in my freezer at home as well as a banana I’d never gotten round to using. As soon as Ms. G saw them she said ‘They’re not blackberries.’ So we made boysenberry banana sorbet instead.

Since the majority of the ingredients were frozen it only took about 20 minutes in the ice cream machine and then maybe an hour of freezing. Gina picked her ice cream maker up on ebay for twenty bucks but she says that with this recipe, you don’t even need one. Having blended everything together in a food processor, you would simply transfer it into another container and leave it in the freezer, stirring with a whisk every half hour until set. You could hypothetically do this with any recipe but it works best if the ingredients are already frozen. In fact, once the mix was blended we wanted to eat it with a spoon then and there!

Banana Boysenberry Sorbet (from ‘The Perfect Scoop’ by David Lebovitz)
1 medium ripe banana (mine was chopped and then frozen, but it doesn’t matter).
2 cups of frozen boysenberries (you could really use any berries).
½ Cup caster sugar
1 Tablespoon fresh lime juice
Place all ingredients in the food processor and blend until most of the skins are liquidised. You can’t really strain them out because you won’t be left with much.
Chill in the ice cream maker as per its instructions or if you don’t have one, place immediately in the freezer, whisking every half hour until set. Consume ASAP.

What’s your favourite ice cream flavour?

I have a friend, let’s call her Ms. G, who is in the habit of whipping up amazing and intricate dishes on a regular basis. I’m always excited to be invited round for dinner and luckily, she doesn’t live far and invitations are frequent. Ms. G is adept at homemade ice cream, paella, bread made from scratch, risottos…the list goes on. I’m amazed at her patience at skill and it’s serendipitous that she’s an expert in all those dishes I would never dare attempt.

In my own kitchen, my absolute favourite recipes are those that involve minimal effort but yield maximum results. This probably has as much to do with my lack of patience as it does pragmatism, but nothing gives me more pleasure than recipes that are zero fuss and yet somehow, absolutely stunning. It never continues to amaze me how many recipes pack a massive flavour punch with very few ingredients, very little effort and very little time.

Amaretti was one such happy surprise for me. I had always marvelled at their crisp outer shell and chewy centre, perfect with a ristretto or dunked in a cappuccino. Surely, I thought, they must be fiddly and time consuming to taste this good, something like macarons. And yet these little Italian biscuits were as forgettable as they were delicious; in fact it wasn’t until about a year ago that I looked online for a recipe. I ended up selling some to a cafe for a while but due to their understated appearance, that didn’t last long.

This is one of the easiest and fastest biscuit recipes you will ever make in your life- all you do is whisk a few ingredients together with a fork, roll the mix into balls and bake. Enjoy!
Stellar Amaretti
200g almond meal
¾ cup caster sugar
2 egg whites
¼ teaspoon almond essence
Icing sugar, for dusting
Preheat oven to 175◦c. Line two biscuit trays with baking paper.
Beat sugar, almond essence and egg whites together with a fork until smooth. Stir in almond meal with fork.
With dampish hands, roll small amounts of the mixture into balls of 2-3 cm in diameter and place on trays. I usually fit about 11 per tray. Flatten them with your fingers and dust liberally with icing sugar.
Bake for around 12 minutes. They should not be brown, just starting to get a touch of colour on them. Cool for one hour before serving and/or storing in an airtight container.
Makes 25 amaretti, which will keep for up to 2 months. Makes a great Christmas gift!
So, readers, do you have a favourite no-fuss treat?
About me
 Sharing easy recipes, hunting down the best coffee. Honest accounts, nothing too serious. Read more...
As featured in…


Connect


Popular posts this month…
 Review – Philips Saeco Intelia posted on January 10, 2012
  The quest for Mex part 2 – Feisty Chicken Burritos posted on December 21, 2010
  Sri Lankan Spinach with Coconut posted on December 10, 2010
  Lemonade Scones and family recipes posted on February 25, 2011
 - Café Review – Petty Cash Cafe, Marrickville posted on May 31, 2011
 Kosher Whole Orange Cake posted on July 5, 2011
 - Sparkling Long Black posted on May 10, 2011
- Salat Hatzilim posted on January 28, 2011

